There is a fine art to the camping meal. You need to be able to use as few pots as possible, all the preparation needs to be done at home, and it needs to be hearty to feed starving little and big people alike. If you are organised, it will feel less like a catering exercise and more like a holiday, as much of your day can be quickly consumed by the preparation, eating and cleaning up after meals at camping.
Plan, plan and plan
The key to stress-free catering while camping is to think a few weeks ahead with some freezable meals. The great advantage of this is that the meals, once frozen, double as ice blocks in the esky to keep the rest of the food cold during your trip. It is often best to freeze larger meals into plastic containers rather than snaplock bags as they remain frozen for longer and don’t leak into the esky. If space is an issue, use snaplock bags but double bag them to minimise food leakage. Have all meals in the freezer at least two days before you leave to ensure they are frozen solid by the time they go into the esky.
If you are going with another family, divide up the menu between you. However, where there are more than two families it is better for everyone to bring their own food to minimise wastage and for ease of reheating large volumes of food. Camp stoves can be really slow so heating enough water to cook large volumes of pasta can be a challenge. Remember that everyone gets really hungry so you need to allow bigger portions than you do at home.
Menu ideas
Here are some great food ideas that work regardless of the time of year you go.
The first night can often be quite stressful after setting up camp, so a quick meal such as marinated meat with salad and bread rolls is a great option. You only need a frypan and the meal can be on the table in 15 minutes. Chicken is a good option here as it is not great in the esky over long periods of time so good to get this meal in first up. Chicken wraps also work well if you don’t have space for rolls.
Great camping breakfasts include bacon and egg sandwiches and pancakes. Treat cereal generally makes it into the camp box as well so kids can feed themselves something if they get out of their sleeping bags earlier than the rest of the camp.
Bean quesadillas are a big hit for either a lunch or dinner meal. Pre-cook and freeze the bean mixture and quickly reheat it on the day. Use the frypan to cook the quesadillas, and flip them using a spare plate.
Soups are great on camping adventures for lunches or afternoon snack time. Veggie burgers or hamburgers are also favourites.
You can’t beat a bolognese or casserole for hearty dinners a few days into your trip. You only need to cook the pasta or add potatoes while you are there.
Sausages in bread are a great last day lunch when you are packing up the campsite and too tired to think of anything new. They keep frozen in a clump for quite a few days (rather than in a line where they defrost faster).
Snacks
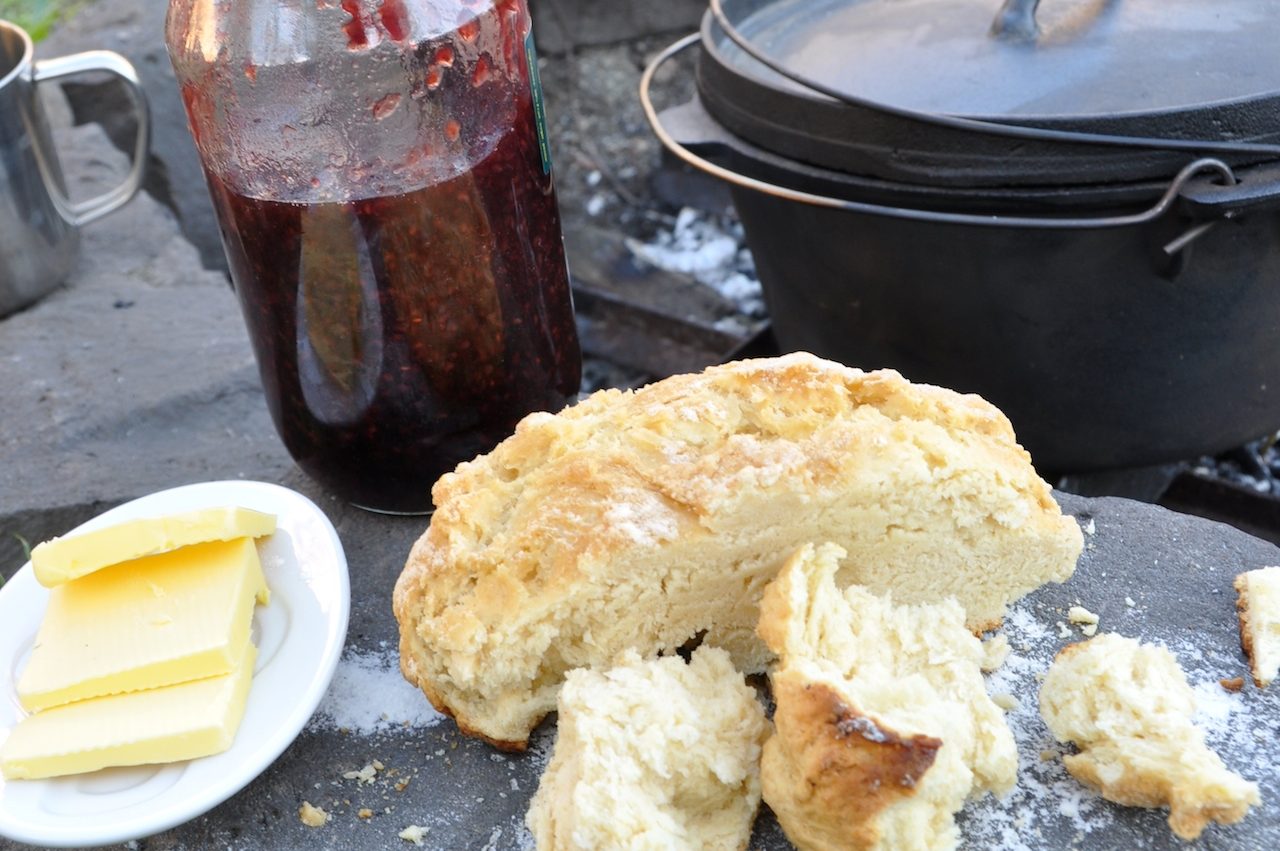
No camp is complete without damper. Pre-measure the flour before you go so you only need to add salt, butter and water on the day. See our recipe below for a great damper.
Snacks that work really well are tins of baked beans, tuna in oil, chick peas, corn and diced fruit packs when you run out of fresh fruit.
Popcorn can be cooked in the camp oven, and the obligatory toasted marshmallows make for a great post-dinner snack. Use sticks from nearby bush as skewers. A quick lesson in fire safety is recommended before the marshmallow toasting begins.
Camp hygiene
Keeping a reasonably hygienic environment can be a bit tricky during camping. A pump pack of hand sanitiser can be a lifesaver, so keep it on the camp table and accessible at all times. If you are using stream water, consider boiling it prior to washing your dishes in the water as a precaution. Put the water on to boil on the stove or over the fire while you are eating so that it is ready not long after the meal is finished. If you can, bring your own water for both drinking and cooking as you know it is safe.
Camp kitchen utensils
- Frypan
- Saucepan big enough for pasta
- Colander for draining pasta and rinsing salad and veggies
- Cast iron camp oven
- Egg flip
- Tongs
- Vegetable peeler
- Potato masher if required
- Chopping board
- Serrated knives (little one and bread knife)
- Portable camp stove and spare canisters
- Serviettes and paper towel
- Aluminium foil and plastic wrap
- Dishwashing detergent and sponge
- Bowl for dirty dishes
- Rubbish bags (ones with handles that you can hang up high best to keep nature out at night)
- Matches
- Torches (it can be tricky cooking without additional lighting)
- Toilet paper
- Hand sanitiser in a pump pack
- Plates and bowls
- Mugs and cups
- Cutlery
- Plenty of tea towels both for dishes and covering food. Or take a large piece of muslin to cover any food during preparation
- Insect repellant and sunscreen.
Food staples
- Tea, coffee and hot chocolate
- Sugar
- Pepper and salt
- Spray oil
- Olive oil and vinegar premixed into dressing if salad is on the menu
- Pancake ingredients and toppings
- Marshmallows and popcorn
- Tomato sauce, tomato sauce and more tomato sauce (plus any other family favourites)
- Baked beans, tinned tuna, tinned corn, or tinned spaghetti as afternoon snacks
- Diced fruit packs if you are staying a longer time
- Dried fruit and nuts and muesli bars.
DAMPER RECIPE
Serves: 4–6
Prep time: 10 minutes
Cook time: 40 minutes
Ingredients
- 3 cups (450g) of self-raising flour
- 1 pinch of salt
- 80g of butter, cubed
- 185ml (¾ cup) of water
Serve with
Extra butter and jam
Method
- You need a great bed of coals to cook the damper well, rather than a raging fire. Start by stoking the fire up early then letting it die down to hot coals so that you have a good coal base to place the pot in.
- Put the pot into the coals for about 15 minutes before you are ready to cook the damper. Ideally, you will have coals coming up 6–8 cm (2 inches) on all sides of your camp oven or pot. Drop a little bit of butter into the pot to prevent the damper from sticking to the pot.
- Mix together flour and salt in a bowl.
- Add butter to flour mix and, using your fingers, rub butter into the flour until all the butter is crumbled through.
- Add the water and mix using a spoon or cut through with a knife. It should come together to form a dough. Knead lightly. Don’t over knead the dough as the mix may become tough. Handle it as little as possible.
- Sprinkle the top with a bit of extra flour if you have it. You can score it into wedges if you like at this stage.
- Place dough into your hot camp oven, and cover with the lid.
- Cook for 30 minutes, rotating the pot every 10 minutes to ensure an even heat. After 30 minutes, check it is cooked by tapping on the top – it should sound hollow.
- Remove pot from coals and set aside for 10 minutes with the lid still on.
- Cut into wedges or break apart and serve with butter and jam.
What are your favourite camping meals?


 Healthy weight week: cook all 7 meals in a few hours
Our first journeys into Quetico and the Boundary Waters wilderness are not exactly remembered for their culinary delights. Camp meals improved considerably after a few trips but we are always on the lookout for something better.
Helen, same here. It took several trips (and much research with seasoned campers) to take the stress out of camp cooking. Glad you found it helpful!
Thanks my friend.. i am so happy when read ur cmt